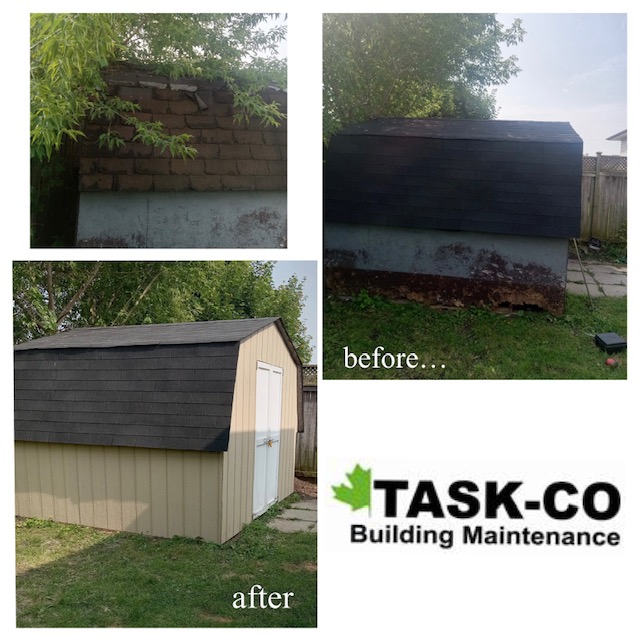
A garden shed is not merely a functional storage space; it is an integral part of your outdoor sanctuary, a place where gardening tools find their home and where creativity blossoms. Over time, weather elements and neglect can take a toll on its exterior, leaving it worn and unattractive. However, with a little effort, restoring the facade of a garden shed can breathe new life into this humble structure. In this blog post, we will explore the steps and considerations involved in reviving the beauty of a garden shed.
Assessing the Condition:
Before embarking on the restoration journey, take a moment to evaluate the shed’s current condition. Assess any damage, such as rot, cracks, or loose boards. Note areas that require repair or replacement. This assessment will guide your restoration process and help you plan the necessary materials and tools.
Cleaning and Preparing:
Clear the shed’s surroundings to create a safe and spacious work area. Remove any debris, plants, or obstacles from the vicinity. Thoroughly clean the shed’s exterior by scrubbing away dirt, cobwebs, and mildew. Use a pressure washer, mild detergent, and a stiff brush for tougher stains. Allow the shed to dry completely before proceeding.
Repairing and Replacing:
Address any structural issues first. Replace rotten or damaged boards, reinforce weak spots, and fix any loose or broken components. Ensure that the shed’s foundation is stable and secure. This step is crucial for maintaining the shed’s structural integrity and ensuring a long-lasting restoration.
Sanding and Smoothing:
Once the shed is repaired, sand the entire exterior to create a smooth surface for the new finish. Start with a coarse-grit sandpaper to remove old paint or varnish. Then, transition to finer-grit sandpaper to achieve a polished finish. Sanding also helps to create a better bonding surface for the new paint or stain.
Choosing the Finish:
Consider the aesthetic you want to achieve and the shed’s surroundings when selecting the finish. Paint offers versatility and comes in a wide range of colors, allowing you to personalize your shed. Stain, on the other hand, highlights the natural beauty of the wood grain. Whichever option you choose, make sure it provides adequate protection against weather elements and is specifically designed for outdoor use.
Applying the Finish:
Before applying the finish, protect the surrounding areas with drop cloths or masking tape. Begin by applying a primer to ensure good adhesion and enhance the durability of the final coat. Once the primer is dry, apply the chosen paint or stain according to the manufacturer’s instructions. Use a paintbrush or roller for even coverage, working from top to bottom. Apply multiple thin coats, allowing sufficient drying time between each coat.
Finishing Touches:
To complete the restoration, consider adding extra touches that enhance the shed’s appearance. Replace or update door hardware, such as handles or hinges, to complement the new facade. Install decorative trim or moldings for added charm. Additionally, you can consider planting climbing vines or hanging flower baskets nearby to create a picturesque backdrop for the shed.
Restoring the facade of a garden shed is a rewarding project that can transform a weathered structure into a visually appealing focal point in your garden. By following the steps outlined above, you can bring new life to your shed, prolong its lifespan, and create an inviting space that harmonizes with the natural beauty of your surroundings. All of this can amount to a decent size handyman job and may not be for everyone, especially in this summer heat. Contact Task-co to inquire about handyman service rates for projects such as backyard shed and deck restorations.